
Traditional Irish Soda bread: The 4-Ingredient Lifesaver
- Vanity

- 11 jan
- 4 minuten om te lezen
Bijgewerkt op: 27 jan
Let’s be honest: yeast is not always as friendly. Sometimes it works with you, and sometimes despite your best efforts, the dough just refuses to rise. I’ve had my share of flat loaves.
I know through these "failures," you become better. But some days, you just don't have the strength (or the time!) for a 12-hour rise. You want. Bread. NOW!
That is when I turn to Irish Soda Bread. This recipe comes together so fast that you can have fresh bread on the table in just 45 minutes. What’s even better? It requires no yeast, almost no kneading, and it comes out perfectly every single time. It is my ultimate emergency bread.


The Crumb Factor
Because we aren't using yeast, the texture is a little different. It has that wonderful home-baked flavor we all love, but the crumb is a bit denser than a traditional yeasted loaf.
If you have more time and want to master that airy, classic yeast structure, I highly recommend trying my Traditional Dutch Volkorenbrood or my Easy No-Knead Artisan Bread.


A Little Piece of History
Irish soda bread was born out of necessity. Since many people in Ireland couldn't afford yeast, Sodium Bicarbonate (baking soda) became the way to ensure there was still fresh bread on the table. To this day, different versions of this bread exist throughout Ireland.
And that cross we score into the dough? It’s not just for looks. It’s for good luck, and meant to let the fairies out! 🧚✨
Dough-Logica: The Instant Rise
Why does this bread work so fast? It’s all about the reaction between the Buttermilk (acid) and the Baking Soda (base).
Unlike yeast, which needs hours to create gas, this reaction happens the moment the ingredients touch. This is why soda bread requires little kneading.
PRO TIP
Don’t let the dough hang out on the counter! As soon as the buttermilk and soda meet, the dough is activated. To keep your bread light and airy, try to get it in the oven fast.
The Ingredients
For this bread, we are keeping it very traditional. No eggs or butter. This version is so simple, but super tasty. You only need 4 ingredients to shape and bake this dough.


Flour: We are using all-purpose white flour. Irish Soda bread is often made with flour that has a lower level of gluten, so a "strong" bread flour is not needed. Tip: You can also use a mixture of whole wheat and white flour (see Note #1)
Buttermilk - the acidity of the buttermilk is what activates the Sodium Bicarobante. When these two ingredients touch, your dough will start to activate and rise.
Sodium bicarbonate - this is the powerful agents what is used to make the bread rise rapidly.
Salt is used to give the bread some extra flavor.
Oat flakes - To decorate the top (completely optional) You can also use pumpkin seeds or leave it plain.
Step-by-Step
Step 1: Combine
In a large bowl, combine your flour, baking soda, and salt. Make a well in the middle and pour in the buttermilk.
Dough-Logica: No buttermilk in the fridge? No problem. You can swap it easily for plain yogurt. The acid in the dairy reacts instantly with the baking soda to lift the bread, bypassing the need for yeast entirely.
Stir until it starts to come together. Use your hands or a large spoon and mix until the dough sticks together and mixing becomes physically hard. If the dough is too wet, add a little additional flour.


Step 2: The 30-Second Knead
Flour your work surface and turn out the dough on to your work surface. Sprinkle some flour on the top of the dough so it does not stick as much to your hands. Knead the dough. Kneading should be short and very gentle. Your kneading only for the dough to come together into a dough ball.
TIP
You only need to knead for a maximum of 30 seconds. This is approximately only 10 kneads.


Step 3: Shape and Let the Fairies Out
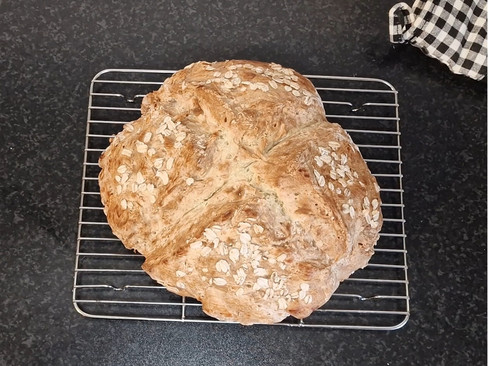
Line a baking tray with parchment paper and transfer your dough ball onto it. Flatten the ball slightly into a disc of 2 centimeters.
Take a sharp knife and cut a deep cross into the dough. Old Irish legend says we do this to "let the fairies out" so they don't curse the bread. Scientifically, it helps the heat reach the center of the loaf, ensuring it bakes evenly.
Brush the top with your leftover buttermilk and sprinkle some oat flakes. You can also swap oat flakes with: sunflower seeds, pumpkin seeds, or sesame seeds. It is also perfectly fine to skip the topping! The golden-brown crust created by the buttermilk is beautiful and tasty on its own.


Step 4: The Quick Bake
Place your dough into the oven at 220°C (430°F) for 20 minutes. Then, lower the heat to 200°C (400°F) and bake for an additional 20 minutes.
The Test
If you aren't sure if it's done, look for a golden crust and listen for a hollow sound when you tap the bottom of the loaf.
Now the hardest part. Take your dough out of the oven and let it rest for 20 minutes on a wire rack before slicing.


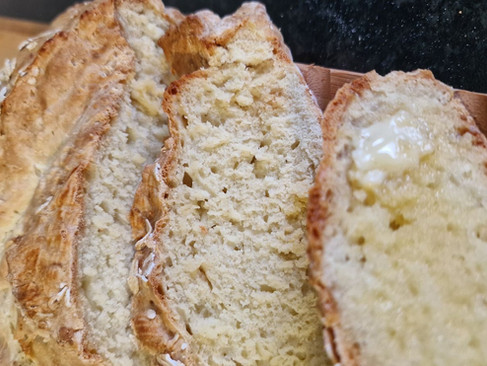
Soda bread proves that you don't need all day. In under 45 minutes, you've created something traditional, and tasty. Add some butter or jam to it and just enjoy!
The bread is nicest when it is fresh and warm.
You can store it in the fridge: it stays good for 4 to 5 days. I highly recommend slicing the entire loaf once it has cooled down and placing the slices in a freezer bag. This way, you can take out exactly what you need. You can enjoy homemade toast every morning.
Watch the step-by-step video
Recipe
1
Flour
This recipe uses a total of 560 grams of all-purpose flour.
If you want to experiment, you can easily swap out a third of the white flour for whole wheat flour. This gives the loaf a deeper, nuttier flavor. In fact, you can use almost any flour you like! All you have to keep in mind is that your "flour mix" should always total exactly 560 grams.
2
Buttermilk
Buttermilk is the engine that sets the baking soda in motion, creating that instant rise. However, if you don't have buttermilk on hand or simply don't like it, you can swap it for 500ml of plain yogurt. Yogurt is acidic just like buttermilk, so it will still react with the baking soda.
3
Kneading
During the kneading process, keep in mind that it needs to be as short as possible. 30 seconds maximum. Your goal is to have a dough that comes together. The dough should not stick to your hands. If the dough still feels too sticky after you’ve started, simply add more flour as required until it comes together.
4
Storage
The bread is at its absolute nicest when it is fresh and warm from the oven. If you have leftovers, here is the best way to store your bread:
In the Fridge: It stays good for 4 to 5 days.
The Freezer: I highly recommend slicing the entire loaf once it has cooled down and placing the slices in a freezer bag. This way, you can take out exactly what you need without defrosting the whole bread. Just put a slice straight into the toaster, and eat it how you like it.
Notes


1
Preheat your oven to 220°C (430°F) and line your baking tray with parchment paper.
2
In a large bowl, whisk the 560g flour, 9g baking soda, and 9g salt.
See note #1: Flour
3
Pour in the 500ml buttermilk. Stir with a spoon until it becomes hard to keep on stirring.
See note #2: Buttermilk
4
Dust your work surface with the 20 grams of flour you set aside. Turn the dough out onto the floured surface and gently start kneading. Your goal here is simply to bring the dough together and shape it into a smooth ball.
See note #3 Kneading
5
Transfer your dough ball on to a tray with parchment paper.
6
Pat your dough ball into a disc about 2 cm thick. Cut a deep cross into the top of the dough of 1,5 cm. Brush the top with a tiny bit of leftover buttermilk to make your oats or seeds stick! Sprinkle the oat flakes on.
7
Bake your bread for 20 minutes at 220°C (430°F). Then, lower the oven to 200°C (400°F) and bake for another 20 minutes to finish the center.
8
Transfer the bread onto a wire rack. Let it cool for at least 20 minutes before slicing. Enjoy!
Instructions
500 ML Buttermilk
9 gram Baking soda
9 gram Salt
10 gram Oat flakes (optional)
560 gram All-purpose flour
20 gram All-purpose flour (dusting the surface)
Dough

No-Yeast Irish Soda Bread: The Ultimate Fool-Proof White Loaf
Author
Vanity

Tired of flat bread and yeast failures? Discover this fail-safe Irish Soda Bread that requires 30 seconds of kneading and no rising time. With just 5 minutes of prep, you'll have a fresh, crusty loaf on your table in under 45 minutes.
Servings :
12
Calories:
175 Calories per slice
Prep Time
5 min
Bake Time
45 min
Rest Time
20 min
Total Time
45 min


Opmerkingen