
Easy No-Knead Artisan Bread Recipe
- Vanity

- 7 aug 2025
- 5 minuten om te lezen
Bijgewerkt op: 28 dec 2025
If you’ve ever wanted to switch from buying bread to creating it yourself but felt intimidated by the process, this recipe is for you. It’s simple, reliable, and once you’ve learned it, it might just become one of your go-to staples.
As someone who’s learning to bake, I make this bread often. Mostly because I love how it tastes more than anything I can buy at the store.
And honestly. I’m proud of my artisan bread every time I take it out of the oven 🥹. There’s something incredibly satisfying about baking your own bread. Even if it’s not perfect, it’s yours and that makes it special.


This bread is easy to make but doesn’t compromise on quality or taste. You’ll get a golden, crackly crust and a soft, airy inside that tastes like something from a bakery.
No kneading. No stand mixer. Just a bowl, a spoon, and about 5 minutes of work. If you don’t want to touch the dough, you don’t have to! You can work the dough recipe around your schedule, not the other way around. Let the dough rise and enjoy the same day, or leave it in the fridge to bake later.


What You Need to Bake Artisan Bread at Home
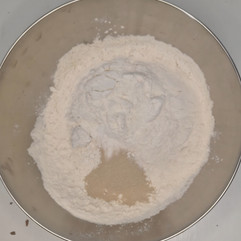
That is very simple, just four ingredients: water, salt, flour and yeast.
Flour
I use bread flour with a high protein content. More protein means more gluten, which helps the bread come out airy and fluffy. I also like to mix in some spelt flour for extra flavor. If you don’t have spelt, just use all bread flour. And if you only have regular plain flour, no problem. Your loaf may not get the big holes, but it will still taste fantastic.
Yeast
For this recipe, I usually use instant yeast. You can mix it right into the flour. If you’re using active dry yeast, just dissolve it in the water first and let it sit for 5–10 minutes. Both work just fine.
The Dutch Oven
This is our secret weapon. It traps steam, creating the perfect environment for a crackly, golden crust. Just like you get from a bakery.
If you don’t have a Dutch oven, you can still make this recipe with what you have in your kitchen. You can bake this bread in a roasting dish, a loaf pan, or simply on a regular baking tray.
How You Can Make Homemade Bread – Artisan Style
Step 1: Mix
In a large bowl, combine the flour, salt, and yeast. Pour in the warm water and mix until the dough comes together. Make sure that all flour is incorporated. You will end up with a that is soft, and sticky. Once mixed, cover the bowl with plastic wrap and leave it at room temperature to rise. I just use a plastic shower cap.


Step 2: Rise
If you want to bake the same day, place the bowl somewhere warm (around 25–30°C / 77–86°F) for at least 2 hours. The dough should roughly double in size, the surface will look bubbly, and it will feel wobbly. If it hasn’t doubled yet, just leave it out a bit longer.
Personally, I like to let the dough rise in the fridge overnight while I sleep. The cold slows the rise, but it also develops amazing flavor and gives the bread a light, tender crumb. That cold rise usually lasts around 10 to 12 hours.
I either prepare the dough in the morning, let it rest in the fridge all day, and bake it in the evening. Or, I make the dough in the evening, let it rise slowly in the fridge overnight, and bake fresh bread first thing in the morning. It depends on what I need the bread for breakfast or dinner.


Step 3: Preheat the Oven and Pot
Place your Dutch oven (with the lid off) into the oven and preheat to 220°C (430°F) for 20 minutes. A hot oven and pot help your bread rise beautifully. I find not preheating the lid will make it easier to handle placing the dough in the pot.


Step 4: Scrape, Shape & Flop
Scrape the Dough
Turn the dough out of the bowl onto a floured surface. It will be wet and sticky. This is how it is supposed to be. Sprinkle some flour on the dough.


Shape the Dough
Use a dough scraper (or a spatula, cake server, or even a big knife) to fold the edges of the dough in toward the middle until you have a loose round shape. Don’t stress about making it look perfect—here at Doughfriendly, perfection isn’t the goal. This step just helps release some of the air in the dough.


Flip the Dough
Place a large sheet of baking or parchment paper next to the dough. Using your scraper, gently lift and flip the dough over onto the paper. Don't worry if this does not go as smoothly. Once the dough is on the paper, you can gently reshape it into a round or slightly oval loaf. With time, you will get better at scraping, shaping and flipping.


Step 5: Set Up For Baking
Carefully remove the hot pot from the oven. Lift the dough using the parchment paper and place it inside. To help create a crispy crust, lightly spritz the inside of the pot with water—or toss in 3 to 4 ice cubes and leave them inside. Put the lid on the pot, then return it to the oven to bake.


Step 6: Bake
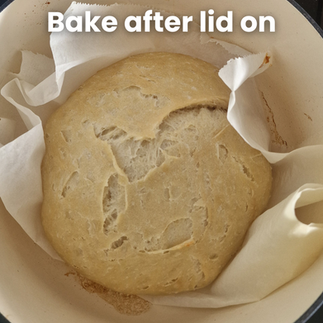
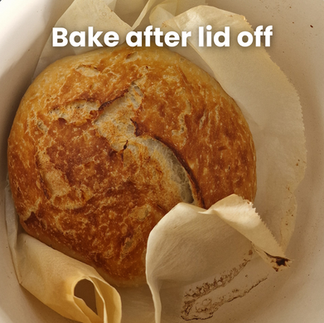
Bake the bread for 20 minutes with the lid on. This traps steam, helping the bread rise before the crust sets. Then, take the lid off and bake for another 20 minutes to brown and crisp the crust. You’ll see cracks form on the surface. This is what we are after. It gives the bread those crispy ridges and that authentic bakery look.


Let the bread cool for about 20 minutes before slicing. I know waiting is difficult, especially with that great smell :-). However, This step is important because it lets the inside finish cooking. If you cut it too soon, the bread might feel a bit doughy.
Watch the step-by-step video
Ways to Enjoy Your Homemade Bread
This fresh bread is so versatile! You can, dip it into your soup or keep it simple and eat it with just some butter. Honestly, my favorite way to enjoy this bread is simple. Toasty with lots of melty cheese. Pure joy!
No matter how you enjoy it, you now have an easy, reliable artisan homemade bread recipe you can keep using for years to come and share with your family.
Enjoy!


Printable Recipe
1
Flour
This recipe uses a total of 445 grams of flour.
I used: 395 grams of bread flour, and 50 grams of spelt flour
You can swap the spelt flour for whole wheat flour if that’s what you have. Just use the same amount (50 grams). Start with that, and if the dough feels a little too wet, you can add a bit more whole wheat flour. If it feels too dry, add a splash of water.
If you don’t have spelt or wholewheat, no worries—just use 445 grams of bread flour or even all-purpose (plain) flour. It will still work.
Bread flour gives the bread a slightly chewier, fluffier texture (like artisan loaves) and helps it stay fresh a bit longer.
All-purpose flour works just fine too—the bread will just be a little softer and less chewy.
2
Yeast
Look for instant or rapid-rise yeast, which you can mix directly into the dry ingredients. If you only have active dry yeast, dissolve it in the water first and combine with flour and salt and continue as usual.
3
Water
I use water at room temperature for this recipe. There’s no need to warm it up. Just make sure it isn’t cold from the fridge or hot from the tap. If the water feels neutral to the touch (neither warm nor chilly), it’s perfect. Water that is too hot can damage the yeast.
4
Dutch oven
A Dutch oven is helpful because you can preheat it until it’s very hot, and it traps steam inside, keeping the crust soft long enough for the bread to rise fully before setting.
If you don’t have one, you can simply bake the loaf on a baking sheet. To create a bit of steam, place another oven-safe tray filled with water on a lower rack while the bread bakes. This will help develop a nice crust.
You can use a roasting pan or a loaf tin. A loaf tin works very well not just for sandwich bread, but for this type of dough too.
Notes


1
In a large bowl, stir together the flour, yeast, and salt. Add the water and mix with a spoon until the dough comes together. The dough should be sticky and messy. If it feels too dry, add a little more water. If it’s too wet to handle, sprinkle in a bit more flour.
See note #1: Flour
See note #2: Yeast
See note #3: Water
2
Cover the bowl with plastic wrap or a reusable cover to keep the moisture in. You have two options for baking. Baking the same day or baking the next day.
3
Option 1: Rise and bake the same day
Place the bowl covered in a warm, draft-free spot. If your room is around 25–30°C (77–86°F), it should double in size and look bubbly in about 2 hours. If your kitchen is cooler, don't worry the dough isn't failing, it's just taking its time. Simply trust the visual cues: wait until it has doubled and looks wobbly and bubbly before moving to the next step.
Option 2: Rise overnight and bake next day
If you want fresh bread for breakfast or just want a deeper flavor, let the dough rise in the fridge for 10 to 12 hours. The cold slows down the yeast, which actually helps develop those complex, bakery-style flavors and a beautiful airy structure.
4
Place your Dutch oven (with lid off) into the oven. Preheat the oven and the pot to 220°C (450°F) for at least 20 minutes. This way, only the pot is heated when you are ready to place the dough inside the pot.
See note #4: Dutch oven
5
Transfer the dough onto a well-floured surface. Lightly flour the top, then gently fold the edges toward the center a few times to create a round ball. Flip or scoop the dough smooth side up onto a piece of parchment paper. Loosely cover and let it rest while the oven preheats.
6
Carefully remove the hot Dutch oven from the oven (use oven mitts!). Lift the parchment paper and place the dough (still on parchment) into the pot. Cover and bake for 20–30 minutes. Lightly spray the inside of the pot with water to help create a crisp crust. You can also place 3-4 ice cubes in the pot. Cover the pot with the lid and bake for 20 minutes. Remove the lid and continue baking for another 20 minutes, or until the crust is a deep golden brown.
7
Transfer the bread onto a wire rack. Let it cool for at least 20 minutes before slicing. Enjoy!
Instructions
330 gr Water
445 gr Bread flour
10 gr Salt
6 gr Yeast
Dough

Easy No-Knead Artisan Bread Recipe
Author
Vanity

This homemade bread is ridiculously easy to make—no kneading, no fancy equipment. Just stir, rise, shape, and bake.
It delivers incredible, bakery-style results with a crusty, golden exterior that is soft with a chewy interior.
The timing is wonderfully flexible, which is part of what makes this dough so forgiving. You can let it rise at room temperature and bake the same day, or skip the room-temp rise altogether and let it develop slowly in the fridge. Either way, you won’t even have to get your hands dirty to create this delicious artisan bread at home.
Servings :
12
Calories:
129 Calories per slice
Prep Time
5 min
Bake Time
40 min
Rise Time
2 hours
Total Time
2 hours 45 min


Opmerkingen